
In this article I'll show you how to easily create a xamarin forms shell project with the following features
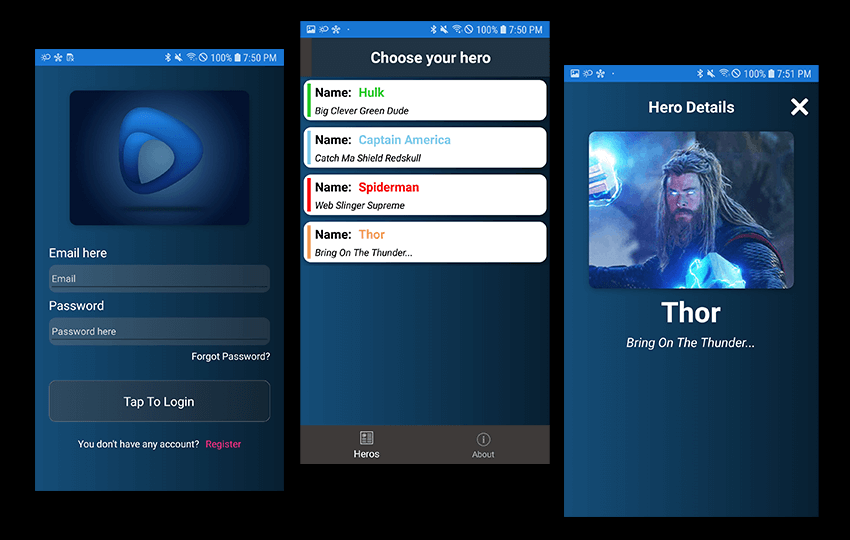
We are going to build the following simple pages within xamarin forms to showcase how we can use Shell with MVVMLight
Login

Tab List

DetailView

So lets get started by creating a new project and adding the required nuget packages
1) Create New Shell project

Once all of the default files have been created. Delete all theproject files exept for the App.xaml and AppShell.Xaml files as shown below.
Now add some additional folders to match the following

The Next step is to 'right click' the solution name and select 'manage nuget packages for solution' and add the packages 'MVVMLight libs', 'newtonsoft' and 'Pancake View'

2) Creating the views, viewmodels and models
The project we are creating is a 'simple' login page that navigates to a tab page containing 2 sub pages.
a) A main heros page with a Collection view containing a list of 'Avenger' which can be selected, This selection will navigate to a non-tabbed details page.
b) simple about page (just for tabs demo).
Every view will be bound to it's own viewmodel and these view models will use xamarin shell to navigate to other views in the app.
Add a base class for each viewmodels
In the base folder, add a new base class for our view models. within this class you would typically add several variables or functions that can be used through all your view models. I've added a 'IsBusy' flag as an example. Note that we are deriving from the GalaSoft (mvvmlight) ViewModelBase class to inherit the notify change events already setup.
public class MvvmBase : ViewModelBase
{
private bool _IsBusy;
public bool IsBusy
{
get { return _IsBusy; }
set {
_IsBusy = value;
RaisePropertyChanged();
}
}
}
Now we inherit all of our ViewModels from our base and simply add these as follows:
public class LoginViewModel: MvvmBase
{....
public class HeroViewModel : MvvmBase
{....
public class HeroDetailViewModel : MvvmBase
{....
Add our repo so it can be injected into our viewmodels
In this section we will add our repository, but in order for us to inject this into our viewmodels we must base the class on an interface and injected this interface into our view model.
First we create a model that we use to hold our data called 'HeroItem'
public class HeroItem
{
public int Id { get; set; } // would be an id in a data store
public string HeroName { get; set; }
public string AboutHero { get; set; }
public Xamarin.Forms.Color Colour { get; set; }
public string ImageName { get; set; }
}
Create a new interface file (In the interfaces folder) called IHeroRepoDemo:
Add 2 methods so we can retrieve our data.
public interface IHeroRepoDemo
{
List<HeroItem> GetHeroList();
HeroItem getHeroById(int id);
}
Now we create our class for the repository based off this interface. Create a new class 'HeroRepoDemo' that contains some functionality to mock data retrieval:
public class HeroRepoDemo : IHeroRepoDemo
{
private List<HeroItem> MockList;
public HeroRepoDemo()
{
MockList = new List<HeroItem> // some basic mocked data
{
new HeroItem { Id=1, HeroName="Hulk",
AboutHero="Big Clever Green Dude",
Colour=Xamarin.Forms.Color.LimeGreen, ImageName="hulk.png" },
new HeroItem { Id=2, HeroName="Captain America",
AboutHero="Catch Ma Shield Redskull",
Colour=Xamarin.Forms.Color.SkyBlue, ImageName="captain.png"},
new HeroItem { Id=3, HeroName="Spiderman",
AboutHero="Web Slinger Supreme",
Colour=Xamarin.Forms.Color.Red , ImageName="spiderman.png"},
new HeroItem { Id=4, HeroName="Thor",
AboutHero="Bring On The Thunder...",
Colour=Xamarin.Forms.Color.SandyBrown, ImageName="thor.png"},
};
}
public HeroItem getHeroById(int id)
{
return MockList.Where(x => x.Id == id).FirstOrDefault();
}
public List<HeroItem> GetHeroList()
{
return MockList;
}
}
So now we have our repo service, view models and views (still need content and hooking up), so lets hook up our viewmodels and repo with MVVMLight
Open our 'App.Xaml.cs' File and add the following:
public App()
{
InitializeComponent();
InitContainer();
. .....
Add a new method as following
public void InitContainer()
{
// repos & services
SimpleIoc.Default.Reset();
// create repo here that we can inject into viewmodels
var Herorep = new HeroRepoDemo();
SimpleIoc.Default.Register<IHeroRepoDemo>(() => Herorep);
// reg common view models
SimpleIoc.Default.Register<HeroDetailViewModel>();
SimpleIoc.Default.Register<HeroViewModel>();
SimpleIoc.Default.Register<LoginViewModel>();
}
This method will register our viewmodels and repository service into the MVVMLight container.
3) Injecting our repo into our viewmodel
When it comes to injecting our repo into our view models it's extremely simple process:
In the viewmodel contructor we simply push the interface we want to inject as follows
public class HeroViewModel : MvvmBase
{
private IHeroRepoDemo repo;
public HeroViewModel(IHeroRepoDemo _repo)
{
repo = _repo;
And thats us done.. Pretty easy.
4) Setting up SHELL
Setting up shell to navigate to our views is a very simple process. We will create a tab view container and two standalone views.
Open the 'AppShell.xaml' file and add the following to the header to disable flyouts globally
xmlns:local="clr-namespace:ShellMvvmDemo.Views"
Shell.FlyoutBehavior="Disabled"
Now change the colour that we want to use for our tab bar in the 'resourceDictionary'
<Color x:Key="NavigationPrimary">#3f3a3a</Color>
Next, select and delete everything between the 2 tags' </Shell.Resources>' and '</Shell>'
Now we can add in our customer tabs and views between the 2 tags' </Shell.Resources>' and '</Shell>
<ShellItem Route="Login">
<ShellContent ContentTemplate="{DataTemplate local:LoginView}" />
</ShellItem>
<ShellItem Route="HeroDetail">
<ShellContent ContentTemplate="{DataTemplate local:HeroDetailView}" />
</ShellItem>
<TabBar>
<Tab Title="Heros" Icon="tab_feed.png" Route="Heros">
<ShellContent ContentTemplate="{DataTemplate local:HeroView}" />
</Tab>
<Tab Title="About" Icon="tab_about.png">
<ShellContent ContentTemplate="{DataTemplate local:AboutPage}" />
</Tab>
</TabBar>
Note the 'Route' name in the shell item, this is used as a routing identifier that we need to reference when we want to navigate to that view. We create tabbars using the 'TabBar' tag and add all of our 'Tabs' inside.
That's all we need to do to setup our shell navigation.
5) Creating and hooking up our views
Login View
We will start by creating out login single page view.
We will simply add a gradient for the back ground, image, some login fields and a login area but we only hook up the login button for this demo.
Add our gradient
background
:
<cake:PancakeView
VerticalOptions="FillAndExpand" Margin="0,0,0,0"
BackgroundGradientAngle="270"
BackgroundGradientStartColor="#154E79"
BackgroundGradientEndColor="#081F30"
CornerRadius="0" HasShadow="False" >
Now hook up the login area via a command onto our view model.
<cake:PancakeView
Grid.Row="8" Margin="0,20,0,0"
BackgroundGradientAngle="270"
BackgroundGradientEndColor="#122635"
BackgroundGradientStartColor="#2E4B61"
CornerRadius="10" HasShadow="False"
HeightRequest="60" BorderColor="Gray" BorderThickness="1">
<Label FontSize="Medium"
Text="Tap To Login"
TextColor="White"
VerticalTextAlignment="Center"
HorizontalOptions="CenterAndExpand"/>
<cake:PancakeView.GestureRecognizers>
<TapGestureRecognizer
NumberOfTapsRequired="1"
Command="{Binding LoginCommand}" />
</cake:PancakeView.GestureRecognizers>
<cake:PancakeView>
Note I wont be showing the full code the the app in the article. But you can this from my GitHub repo.
Our viewmodel code to trigger the shell navigation to our tabview.
private async void LoginCommandHandler(object obj)
{
// demo so just route here
await Shell.Current.GoToAsync($"//Heros");
}
Note how the route matches what is specified within our 'AppShell.Xaml' file.
We will add the same gradients for all of our backgrounds etc. so that code wont be shown here.
Main View
Out main view as per the shell structure is a set of 2 tabs.
A 'Hero View' and a 'About View'. Hero view will contain a collection view that will push the selected complex object to the 'HeroDetailView' as follows:
Hero View
Within our hero view we will add a collection of 'HeroItems' within a collection view
<CollectionView ItemsSource="{Binding HeroList}" SelectedItem="{Binding SelectedHero}" BackgroundColor="Transparent" SelectionMode="Single" >
<CollectionView.ItemTemplate>
<DataTemplate>
<StackLayout >
<cake:PancakeView HorizontalOptions="FillAndExpand" CornerRadius="10" >
[our grid here with the layout for the items]
</cake:PancakeView>
</StackLayout>
</DataTemplate>
</CollectionView.ItemTemplate>
</CollectionView>
As you can see we have a binding from our 'SelectedItem' to our ViewModel property ''SelectedHero' and as we want to pass this whole object to our detail view using standard shell we would have an trying to pass every class property!!
But we do have a way around this restriction and that is to serialise the object as json, pass this json with the route and deserialise on receipt on the detail view side as follows.
public HeroItem SelectedHero
{
get { return _SelectedHero; }
set {
if (value == null)
return;
// send via shell
string parm = Helpers.JsonHelper.SerialiseObject<HeroItem>(value);
Shell.Current.GoToAsync($"//HeroDetail?hero={parm}");
}
}
My helper class just uses basic newtonsoft json serialisation.
public static class JsonHelper
{
// serialise object
public static string SerialiseObject<T>(T dataIn) where T : new()
{
var ser = JsonConvert.SerializeObject(dataIn);
return ser;
}
// deserialise object
public static T DeserialiseObject<T>(string dataIn) where T : new()
{
var ser = JsonConvert.DeserializeObject<T>(dataIn);
return ser;
}
}
and the final step is to receive the data paramater and deserialise this data and display within our 'HeroDetailView' as follows
[QueryProperty("Hero", "hero")]
public partial class HeroDetailView : ContentPage
{
public string Hero
{
set
{
var converted = Uri.UnescapeDataString(value);
var hero = Helpers.JsonHelper.DeserialiseObject<HeroItem>(converted);
var vm = (HeroDetailViewModel) GalaSoft.MvvmLight.Ioc.SimpleIoc.Default.GetInstance (typeof(HeroDetailViewModel));
vm.CurrentHero = hero; // set data to show in detail bound view
this.BindingContext = vm;
}
}
And that is my step by step guide to using 'Shell', 'MVVMLite' and passing complex object to other views/models.
Any questions then please contact me direct, on facebook or via linked in.
All the code can be found on my git here